| Articles | Documents | Equipment | Events | Links | Membership | Miscellaneous | Scrapbook | Targets | What's New |
|
More Power! Solar power for tent camping |
May 2015 | |||||||||||
| Dan Martinez | ||||||||||||
|
In today’s world, even when you go off to spend some time in the great outdoors,
you just cannot escape devices that need electrical power. Cell phones, tablet
computers, laptops, GPS receivers, FRS radios, LED lanterns, flashlights, battery
powered headlamps, trolling motors even!
More and more our lives have been taken over by things that need to be kept charged
up. That’s easy in our everyday lives where we can blissfully plug in with nary a
second thought. But out there in the wild, camping, we have to keep our limited
resources constantly at the top of our minds.
On my recent deer hunt story, I
mentioned that I was prepared to spend all ten days of the season sitting in my
sniper’s lair overlooking the water hole until a shooter buck should make his
appearance. It turned out that I only needed to spend six days waiting, but
still, that was six days of living off of only what I had brought with me to
camp. When was the last time you tried to tent camp for ten (or more) days
straight?
What would normally be your limited resources for six to ten days of living out of
a tent in the wild? I can think of at least three: propane, water, and ice. I had
brought enough food, but some of it needed to be kept chilled. Washing dishes and
myself consumed most of my water by the time all of my ice melted. So I did have to
break up my waterhole vigil and lose one morning of hunting to head back to civilization
to replenish my stock of water and ice.
Propane was not an issue for me. The weather was warm enough that I did not need it
for heating. Due to electric lighting, I did not need propane to power a lantern. I
only needed propane for cooking, which made for very frugal use of this resource.
But electric power was not one of my limited resources. In times past, I would use
the battery and the alternator of my truck to supply 12 volt DC power to my various
devices that needed to be kept charged. But I hate to idle my vehicle for an hour or
so every couple of days, just to make sure that I was not running down the battery.
The thought of buying a small portable generator to power my tent camp had crossed my
mind a couple of times. But at nearly a thousand dollars for a good one, plus the
hassle of keeping a small engine fueled, maintained, and happy, that thought didn’t
go too far.
You can pack along plenty of extra batteries for things that take double-A or D-cells.
I’ve done that for many years. But what about your rechargeable devices that use
oddball battteries? Are we stuck with plugging them into the truck, using up the
limited resource of the power in your vehicle battery (or the fuel in the tank)?
No – not anymore. With the cost of solar power coming down drastically in recent years,
it is quite feasible to purchase or even build for yourself a small portable solar power
system which will provide you with unlimited (within your camping needs) electric power
for living in the wild. This is what I’ve been experimenting with on my last several
camping trips, and I’d like to share with you what I have learned.
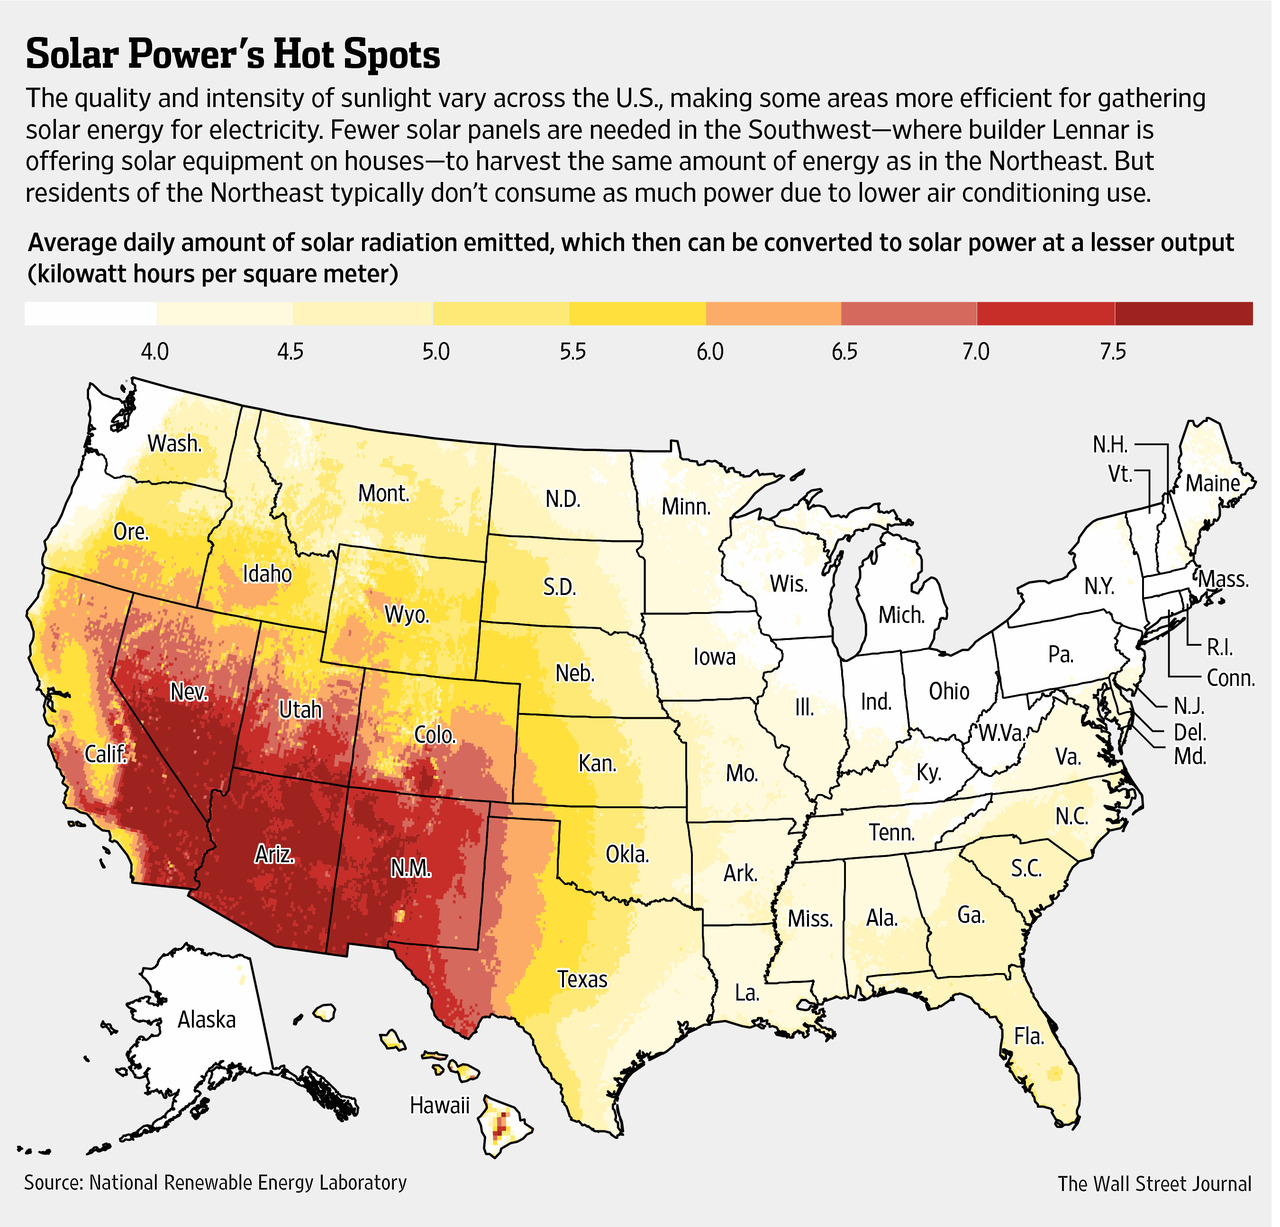
When it comes to solar power, Arizona is literally at the center of the bullseye.
The entire state gets the maximum amount of “insolation” available across the U.S.,
more than 7 kilowatt-hours of daily solar power per square meter. When you think
about it like that, doesn’t it make you want to harvest as much of that bountiful
gift as you can, instead of letting it go to waste?
Now before you start thinking that I’ve become some sort of a “green-weenie,” let me
just say that my interest is more from a practical, even technical-fascination
point-of-view. If taking advantage of the free power that rains out of the sky can
be considered “green”, then that’s fine, but that is not my primary motivation.
First Things First – The Basics
Electricity, especially direct current or DC electricity is often compared to the flow
of water through piping. The comparison isn’t perfect, but it will do.
So first, volts can be compared to water pressure. If you go to your hose spigot, your
typical residential water pressure will be somewhere between 65 to 90 pounds per square
inch. Volts can be considered a measure of electrical pressure. The higher the number,
the stronger the electrical pressure. For camping purposes we will deal primarily with
low voltage DC – either 5 volts or 12 volts.
Amps (formally, amperes) can be compared to gallons per minute of water flow. It is a
rate of flow of electrical energy.
A watt is a measure of the rate of work that is being performed by an electrical device.
It is a measure of electrical power. Most of us have an intuitive sense of watts due
to our familiarity with incandescent electric light bulbs. We understand the difference
between a 25 watt bulb and a 100 watt bulb. There is a very simple formula that relates
volts, amps, and watts. It is
Watts = Volts x Amps
This is an important relationship that we will be using time and again, so drill this
one into your head.
Then there is amp-hours. This is an important measure when we must think about storing
energy in batteries. Going back to the water analogy, it is similar to the number of
gallons of water that a bucket can hold. But with electricity, that bucket is called
a battery. If you have a battery that is rated at 40 amp-hours (Ah), that means that
your battery should be able to supply 2 amps of electricity for 20 hours before it is
all out of juice (2 x 20 = 40).
Finally, watt-hours is a measure of energy consumption. If you burn a 100 watt light
bulb for one hour, you have consumed 100 watt-hours of energy. This is what the
electric company charges you for - actually for your use of kilowatt-hours. You can
calculate watt-hours from amp-hours similarly to how watts are calculated, by
multiplying by volts. You will see how this is useful in an upcoming example.
Generation → Storage → Consumption
Consumption:
First you need to know how much energy you will consume in a typical day of camping.
What do you need electrical power for? At the low end, maybe you just need enough
to keep your phone charged every day. If that’s all you need, you might not need a
solar system at all. Charging from your vehicle will be enough, and a week’s worth
of that small amount of power won’t kill your battery.
How much does a phone need? Well my smart phone has a 1950 milli-Amp-hour (mAh) battery.
A day’s use might take it down to a 50% charge level. So to charge it back up to 100%
might take 1000 mAh (the same as 1 amp-hour) at 5 volts. This is equal to 1Ah x 5V = 5
watt-hours of power.
To charge your phone from your car you will need one of those cigarette lighter USB
adapters to convert from 12 volts to 5 volts. We needed to translate the power to
watt-hours because the phone and your car use different voltages. You cannot directly
compare 5V amp-hours to 12V amp-hours. But watts is watts and watt-hours are watt-hours
regardless of voltage.
To convert our 5 watt-hours to amp-hours of 12 volt power, we divide 5 W-h by 12V to get
.42 Ah of 12V power. Now multiply that figure by 7 days, and we see that it will take
about 3 Ah of charge out of our car’s battery to keep the phone charged for a week.
The battery in my SUV has about 55 Ah of capacity. 3Ah out of 55 in your car’s battery
ain’t beans. Does this start to give you a feel for how to work with these numbers or
have your eyes already glossed over?
It’s when your electrical devices start to multiply that you might want to start thinking
about creating some electrical power during the day, and capturing it in a battery for
use in the evening. Maybe you have a tablet computer that you’ve become addicted to.
Or maybe you want to watch a movie in the evening on a laptop computer. Maybe you want
to run LED lights in the evening around camp. For each of these, you need to figure out
how much power they consume and for how long you will be running them.
Do you need to run AC appliances? When dealing with small portable solar power systems,
it is best to try to avoid AC appliances as much as you can. To run AC devices, you
will need an inverter. An inverter takes DC power as input and gives you a house-style
AC power plug for output. The problem is that inverters are not 100% efficient. Some
power is wasted in the process of creating AC out of DC. But here’s the other thing:
Since 120 volts AC is 10 times the volts of 12 VDC, an AC device that needs, let’s say
5 amps of AC will need 5 x 10 = 50 amps of DC! That’s why it is best to avoid trying
to power AC devices from your portable solar system.
Storage:
The essence of off-grid solar power is all about battery charging. You might charge
your devices directly from a solar panel, or you might charge a separate battery, from
which you in-turn, charge your devices.
The easiest thing to do might be to use your solar panel to keep your vehicle battery
topped off. Then you can keep all your devices charged by plugging them into the
lighter sockets in your vehicle, and you won’t have to worry about a dead battery at
the end of the camping trip.
But when it comes to lead-acid batteries, there’s something that you need to be careful
of. You can severely limit the life of lead-acid batteries by discharging them
repeatedly over 50%. That means that you need to plan to have a battery at least two
times as big in amp-hour capacity than your daily use. – And your solar panel has to
be big enough to bring your battery back up to 100% charge with the amount of sun
available to you in one day. More about that later.
As an example, say that you have added up all your power requirements for a day’s use
and you came up with 10 amp-hours of 12V consumption. That means that your battery
should have a capacity of at least twice that amount, or 20 amp-hours of capacity.
Just about any car battery will meet that requirement. But there’s more to consider.
A car battery is not designed for deep discharge. It is designed to deliver a great
surge of power for just a few seconds, then to be under constant charge from the
engine running the alternator. A car battery is designed with a large number of
thin plates to be able to deliver that large, but short starting current. As
designed, a car battery in normal use is not discharged more than about 10%, maybe
less, before it starts getting immediately recharged.
For solar power applications, what you really want is a deep-cycle battery. The
so-called marine deep-cycle batteries are a step in the right direction, but they
are not true deep cycle batteries. If you don’t see an amp-hour spec on a battery
it is not a true deep-cycle battery. Instead, on car batteries, and on marine
batteries, you will only see a cold-cranking amp (CCA) spec, or a marine cranking
amp spec (MCA) or a CA spec of some other kind (hot cranking amps, for example).
Notice something about this? Yes, they are all talking about starting an engine –
high current draw for a short time. Some will be labeled with a reserve capacity
(RC) spec, which is almost what we want, but still not quite. You want to look for
an amp-hour spec.
What’s so different about a true deep cycle battery? They have fewer, thicker
plates. They cannot deliver a great sudden rush of high amps, but the amps they
can deliver, they deliver over a prolonged period of time. Plus they can do that,
get recharged, and do it over and over, many cycles of deep discharge and recharge,
and still maintain a long service life. Another key to long life is to always
charge them back up to full as soon as you can. Don’t let them sit around partially
discharged.
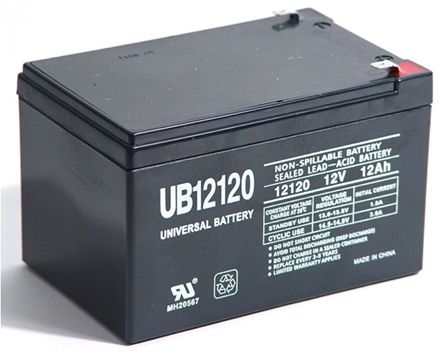
If you’ve decided to invest in a separate, deep cycle battery for your tent camping
power system, you need it to be portable, to be able to move it into and out of
your tent, or around camp. You don’t want acid sloshing around, so you will need
a sealed battery, not a “flooded cell” battery. The best type of sealed battery
to use for this purpose is called an AGM battery -- Absorbed Glass Mat. You can
leave an AGM battery upside-down for as long as you want, and no acid will leak out.
Yes, it is still a lead-acid battery, but all the acid is soaked into and held by
fiberglass mats between the lead plates inside the battery.
Note that an AGM battery is not a “gel-cell” battery. Gel-cell batteries are an
older sealed battery technology that you should avoid as well. Gel-cell batteries
have very strict charging requirements that if not followed precisely will result
in destroying the battery.
Generation:
Now we get to solar cells and solar panels. The dominant type of solar cells are
based on the silicon junction just like diodes and transistors. In fact, a solar
cell is very similar to a large, wide diode. But the silicon junction is
optimized to create a voltage when it is lit up by a strong light source. This
voltage is then harnessed to create electricity from photons.
Each solar cell only creates around ½ of a volt. So to get a useful voltage, a
number of cells need to be strung together to create a solar module, which we
normally call a solar panel. To charge a 12V battery, the voltage needs to be
higher than 12V to be able to force a charge into a battery. Normally, a solar
panel meant to charge a 12V battery consists of 36 solar cells, generating
around 18 volts on average. Depending on available sunlight, a 36-cell solar
panel could produce as much as 21 to 22 volts.
Now if you are thinking that connecting a voltage that high to charge a 12V
battery can’t be a good idea, you would be right. So most solar charging
systems will include a solar charge controller to modulate the actual charging
voltage going to the battery.
When you start looking into solar panels you will find that there are three
main types, plus a few other minor types. I’ll stick with discussing the
three major types you should consider. You will see the terms amorphous,
polycrystalline and monocrystalline when you start reading up on solar panels.
Amorphous solar panels are the least expensive to produce, and the least efficient.
The low efficiency translates into a larger surface area needed to produce a given
amount of power in watts.
The two crystalline types, polycrystalline and monocrystalline are similar in
efficiency (between 17% and 22% presently), but may differ in their performance
at high temperatures and in low level light conditions. But there really isn’t
a good reason to choose one over the other in my opinion. Poly will be slightly
less costly.
Is there a place for the low efficiency amorphous panels? I use one mounted
outside my garage to keep a trickle charge on my less-used motorcycle batteries.
I have a couple of street legal dirt bikes that may go for a month or more between
rides, but they both have a digital clock that pulls a small amount of power
constantly. Ignore them for two or three months and I will have a dead battery
and will most likely need to replace it.
With only 5 watts of power, my little amorphous panel doesn’t need a charge
controller. When connected to a battery, the battery pulls the panel’s voltage
down to the battery’s voltage, even though the open-circuit voltage of the
low-power panel is over 20 volts. Let’s do the math: The battery is around
12.7 volts, being charged by a 5 watt panel. 5 watts divided by 12.7 volts =
.394 amps. That’s why it is called a solar trickle charger.
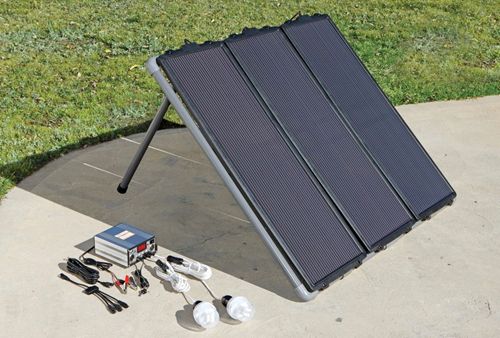
Maybe you have seen the 15 watt panels, or the 45 watt solar panel kit that
consist of three 15 watt panels sold by Harbor Freight. These panels are
amorphous panels. For under $200, this kit is not a bad way to get a portable
tent camping solar system all in one shot. It even includes two 12V LED lights
to light up your tent or EZ-Up canopy at night. The only thing you need to add
is a battery. The downside of the kit, is that 45 watts of amorphous panels
need more space than the equivalent area of crystalline panels.
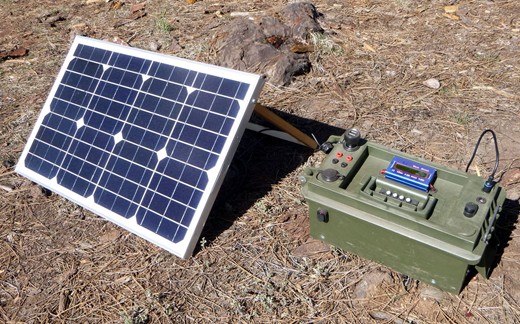
I started my solar experimentation with a 30 watt monocrystalline solar panel.
This panel is about 26” x 16” in size, or 416 sq. in. For comparison a single
15 watt Harbor Freight panel is about 36” x 12” or 432 sq. in., and it generates
half the power. On Amazon, I paid a little less for the monocrystalline panel
than the online cost of a single Harbor Freight panel.
Once you get over about 10 watts of solar panel, you need to have a solar charge
controller to limit and control the voltage to the batteries. When a charge
controller regulates the voltage, you end up with something less than the
theoretical maximum charge current. I was seeing real world charge currents of
around 2 amps from my 30 watt panel through the charge controller. For the size
of batteries I was charging, that was just about right.
This brings me to a rule-of-thumb that seems to work well for sizing your system
components. It works for small 12V systems like what I am talking about in this
article.
After determining your daily power requirements in amp-hours, double, or even triple
that figure to get your needed battery amp-hour capacity. If you only double it, your
daily “depth of discharge” or DoD, will be 50%. That’s OK for true deep cycle batteries,
but if you can discharge to a lesser DoD, your batteries will live longer.
Now that you have your battery amp-hour capacity figure, use that number in watts as
your minimum solar panel total power output. Here’s my example:
I determined that I would use up to 10 amp-hours of 12V power in one evening of
camping. I built a solar battery pack with two 12 amp-hour batteries for a total
of 24 amp-hours. My maximum DoD would therefore be 10 ÷ 24 = 42%. To recharge
daily usage, I would need a solar panel of at least 24 watts, I purchased a 30 watt
panel.
I boxed those three paragraphs, because if all the numbers and figures and other
technical stuff in this story has your head swimming by this time, this is the
nugget that you need to know to go forth and conquer.
Why does the battery amp-hour to watts of solar panel rule-of-thumb work? Even
though the hours of sunlight in a day is 12 give or take a couple, for solar power
considerations, a day is assumed to have only 5 full-sun equivalent hours. That’s
because your panels are generally going to be stationary, pointed due south to get
the most sun over the course of a day. The angle will not be perfect to capture
the most sunlight possible for the whole day.
Using our 30 watt example again, with 5 hours of full-sun equivalent light, we
should be able to harvest around 30 x 5 = 150 watt-hours of power over the course
of the day. 150w-h ÷ 12V = 12.5 amp-hours going back into your battery. That’s
just a shade more than the 10 amp-hours we calculated as our daily consumption,
giving us some overhead room for charging inefficiencies, and to make sure that
we do get back to a fully charged battery.
Actually, here in Arizona where we get so much sunlight, the 5 full-sun equivalent
hours figure is conservative. As long as a tree does not shade your panels
sometime during the day, we could probably count on a figure of at least 6 full
sun equivalent hours.
Size Spectrum of Portable Solar Systems
The first two do not even need a 12V lead-acid battery. They are 5V only
systems designed for recharging cell phones and tablet computers through the
USB port.
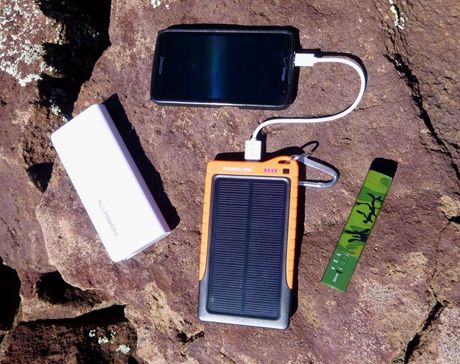
Solar USB Battery:
However, you really shouldn’t think about these devices as a solar charging
system. They are really 90% a USB battery, only 10% a solar charger. Their
solar panels are so small that it would actually take around 4 days of sitting
in the sun to charge them up from 0% to 100%! The solar panel is more of a
novelty than something truly useful.
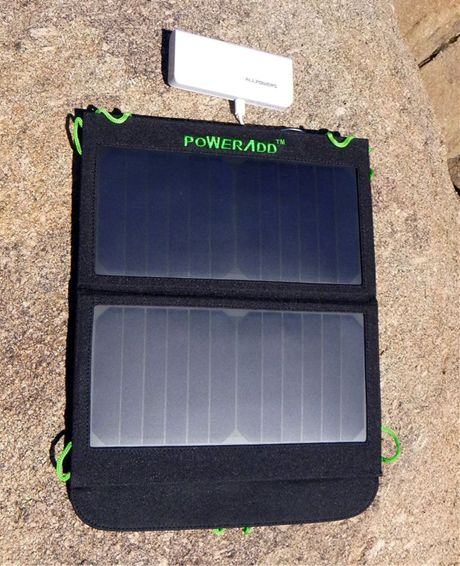
Folding Soft Solar Panel:
Next up is the foldable, packable USB solar charger. You will see these units
with solar capacities between 7 watts to 20 watts, maybe more. When folded,
they are about the size of a book. I think that the most useful ones are in
the 10 to 15 watt size. The reason is that the max charging output of these
devices is held to 2 amps. But to get 2 amps, you need at least the 10 watt
size. Go smaller than 10 and you only get 1 amp out - longer recharge times.
More than 15 watts doesn’t do you any good, as you still only get a max of 2
amps out.
So is even 15 watts too large? I don’t think so. The slightly larger size
lets you generate adequate charging current even if the angle to the sun
isn’t perfect, or the day has some cloudy cover.
The best way to use one of these is not necessarily to charge your device
directly, but instead to charge a USB battery. It’s not a good idea to
leave your expensive electronics sitting in the hot sun. Most of these
foldable solar chargers have some sort of a closeable pouch on the back
side which will hold a phone or a USB battery.
They also usually have some sort of loops around the edges which can be
used for hanging the charger from a tree or a bush, or to hang on the
outside of your backpack while you are hiking.
I wish that I had one of these during my deer hunt. I mentioned that
one of the ways that I kept occupied while waiting for a deer to show
up, was surfing the web and emailing friends and family with my smart
phone. I happened to be in a spot where there was reception, but it
was weak. The phone had to increase its power output to connect,
which drained the battery faster. I had to limit my use of the phone
because of the heavy power usage.
If I had one of these folding solar chargers while sitting in my
sniper spot, I could have surfed and emailed to my heart’s content.
That distraction might not have been a good thing if a deer happened
to walk up while my nose was buried in the phone though!
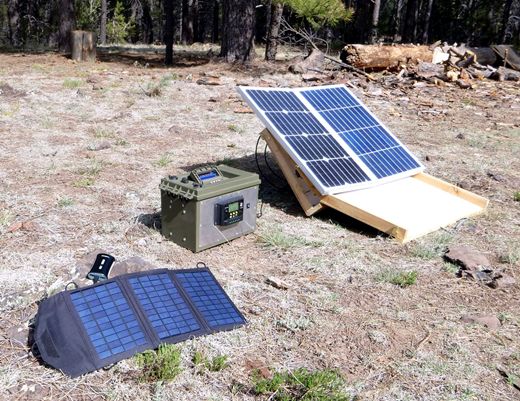
Ammo Can Solar Power Pack V1:
I’ve mentioned this one a couple of times now in the preceding discussion,
using it as the example for many of the concepts explained. It was a really
fun project and not too hard to build.
The company Goal Zero makes all kinds of products for the portable solar
power market. Their stuff is good, but the problem is that their stuff is
really expensive for what you get. Getting started, I really didn’t know
all of the details that I have just explained throughout this article. I
just knew that I wanted to get a solar solution that freed me from
dependence on my vehicle’s battery for keeping stuff charged at camp.
So several years ago, I put down some Goal Zero stuff on my Christmas list.
I put down a Goal Zero solar panel and a charge controller. I figured that
was all I needed since I had some spare batteries laying around.
When Christmas came, my wife got me the charge controller, but no solar
panels. Well, you can’t much blame her. The Goal Zero solar panels are
quite expensive. But of course the charge controller is useless by itself.
So up on the closet shelf the charge controller went for the next two years.
Eventually, I started thinking that I should probably do something with
that thing. That’s when I went shopping on Amazon for solar panels. I
was pleasantly surprised to find that generic solar panels are much more
affordable than the name brand stuff. Soon there was a 30 watt
monocrystalline solar panel on my front doorstep.
I had to rig up some custom cabling to hook up the generic solar panel
to the Goal Zero charge controller, but I’m an electronics guy, so that
was no problem. The first time I took it camping, I had a mess of cables
and attachments and loose batteries all over the place, but the system
worked.
When I came home from the trip though, I knew that I would need to come
up with a friendlier setup. That’s when the idea to build a solar power
pack came to life.
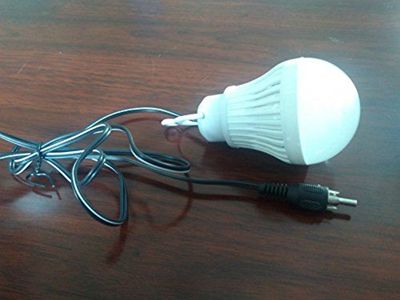
Also while shopping around on Amazon, I found some 12V LED light bulbs
for around $5 each. They had about a 4-foot long cable coming out the
end, terminated in an RCA audio jack type of plug. Of course Goal Zero
has something similar, and fancier, but they cost about $30 each. See
what I mean? I could get four of these on a slow boat from China and
still spend less than one Goal Zero light. RCA plug extension cords
are readily available. What I had in mind was replacing the Coleman
propane lantern that I have hung from the top center of my EZ-Up for
so many years, with four of these lights.
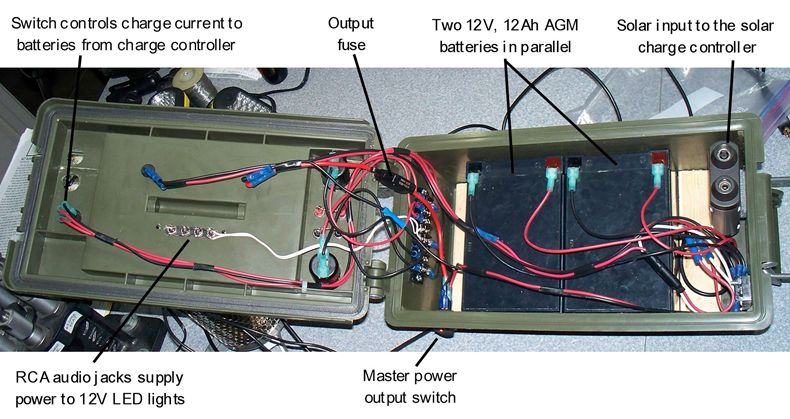
So the design of my solar power pack would include the Goal Zero charge
controller, two 12 amp-hour AGM batteries, RCA audio jacks supplying 12V
power, two cigarette lighter power ports for powering whatever, some
switches to control things, and a power meter. I also added a 12V to
USB power adapter that plugs into one of the 12V cigarette lighter sockets
to charge USB devices.
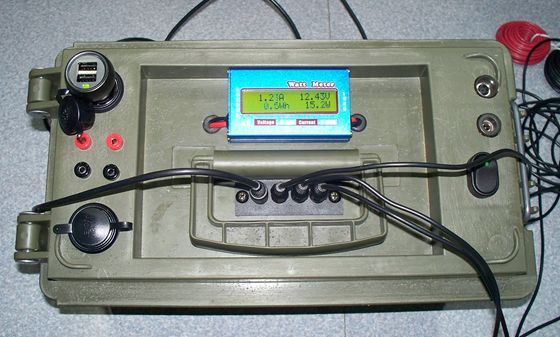
The power meter is an important feature because it allows you to monitor
what is going on. It measures the present voltage of the batteries, how
much DC current is presently being output, and the total number of amp-hours
supplied since turn-on. With only 24 amp-hours available, and the desire
to use less than 12 of those, I think you can see how it might be good to
know how much you have already used, to gauge how much longer before you
should shut-down for the night.
Also, by powering one device at a time, you can see exactly how much power
that particular thing needs to run. That helps you to calculate your total
overall power budget (remember Consumption).
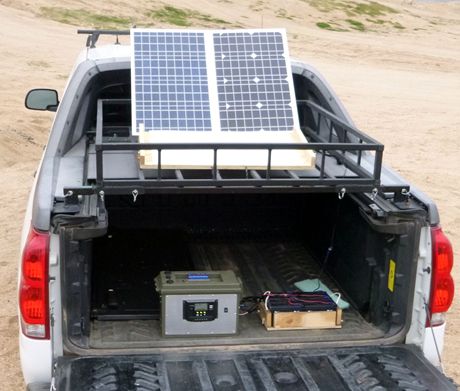
Ammo Can Solar Power Pack V2:
What is the title of this story? More Power! It wasn’t long
after I finished up Solar Power Pack Version 1, that I started work on a
bigger, better one. I also added a second 30 watt solar panel for 60 total
watts of generating capacity.
I used a bigger plastic ammo box, one big enough to hold one of our 35 amp-hour
batteries that we use to run the electric clay thrower. Actually, the box
almost holds two of those batteries. I did squeeze two of them in there, jammed
tight. But when I tried to pick it up, I decided that the weight officially
exceeded the definition of portable! For me, 35 Ah is the limit of tent camping
portability.
I used a different charge controller because the Goal Zero unit had been
discontinued and was no longer available. This Chinese controller is actually
better though. It is mounted externally on the side of the box, instead of
inside because it has a very useful LCD meter that reads battery voltage, solar
panel voltage, and charging current being delivered to the battery. It also
has two USB charging ports built-in, so I didn’t have to use up one of my 12
volt lighter sockets for a USB adapter thingy.
The LCD on the charge controller tells you what’s going in, but to know what’s
going out, I again installed one of those blue power meters on top.
Another change I made was to add some connectors which allow me to connect an
external battery (or battery pack) in parallel to the battery inside. This
allows easy expansion of battery capacity if needed.
This feature was quite useful on my javelina hunt this spring. My hunt was
in Unit 22. Like two years ago, I camped on the west shore of Bartlett Lake
and took my electric powered canoe across to the east shore. A number of
years ago, I built battery packs that consist of four of those 12 Ah batteries
connected in parallel for a total of 48 amp-hours of power for each pack. I
have two such battery packs. They mount under the bottom of the canoe seats.
By connecting one canoe battery pack to the paralleling connector on the solar
power pack, I could charge it during the day while I was hunting on the other
side of the lake, then swap them in the evening. I always had a fully charged
canoe battery when starting the day.
I know that this story got a little long-winded, and in places maybe a little
too technical. I tried to avoid that the best I could. But the subject is
naturally technical. There are numbers that need to be understood and crunched
to make this stuff work.
It has been a fun and exciting journey for me learning this stuff. If you
decide to follow me down this path, I think you too will soon be singing my
tune: More Power!
© Honeywell Sportsman Club. All rights reserved. | ||||||||||||
|
The Honeywell Sportsman Club is a small group of shooting and outdoor enthusiasts in the Phoenix, Arizona area. Our website is ad-free and completely free to use for everyone. But we do have expenses that we need to cover, such as the web hosting fee and our liability insurance. If you enjoyed visiting our website, found it useful in some way, or if you enjoyed reading this story, please consider tipping us through our PayPal donation jar below. Thanks for visiting, and come back soon. |
|
|