
| Articles | Documents | Equipment | Events | Links | Membership | Miscellaneous | Scrapbook | Targets | What's New |
| CMP Garand 2012 - Part 2 | September 2012 | ||||
| Sam Martinez
| |||||
|
Today was the day; I knew the shipment was scheduled to arrive sometime while
I was off at school waiting anxiously for the day to end. This package was
to contain some sort of M1 Garand, but apart from that I had no idea what to
expect. Looks like I will just have to wait until I get home to see what
exactly I just burned 600-something dollars on.
Backtrack to earlier in the week, and my dad was at the CMP store picking
out this rifle for me. I told him to pick out a good rifle, and on the phone
he was alluding that he picked up a unique, special, and somehow different
from the rest, M1 Garand. Of course this got my mind flowing with elaborate
images of what would arrive at our doorstep a few days later via FedEx. Was
it an M1C, or could it possibly be a Match grade rifle? For all I knew my
dad picked out a bright neon pink Garand. Counting down the days until the
package came to our house, I would receive no further clues as to the
condition of the rifle I bought, but I trusted that it would be at least a
decent firearm.
The shipment arrived somewhere around mid-day while I was at school. Right
when I set foot through our door at the end of the day I saw it. There was
a large familiarly rifle shaped box leaned up against the wall just begging
to be opened. My dad and brother were off on their hunt, and I was debating
whether I should wait until they came home to unbox it all. I had to think
to myself, “Well, a little peek wouldn’t hurt I suppose. It is mine after
all…?” Careful not to damage any of the packaging, I began cutting the tape
holding everything together. Once the tape was cut I used gravity as an aid
to getting the contents out of the box. A fancy looking plastic case with
“CMP” stamped into both sides is what came out. Maybe this was the surprise
that my dad was talking about?
After relishing in the case for a short while I moved on in order to find
out what could be inside this fancy case. The hinges creaked upon opening,
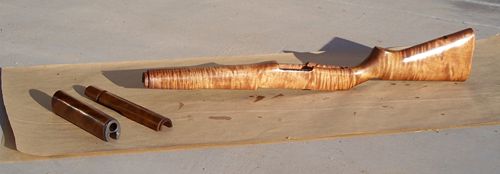
and before my eyes lay a beautiful tiger striped specimen of an M1 Garand.
I immediately noticed that this stock was not like my father’s Garand but
rather it looked like brand new lighter wood. Maybe this actually was a
match grade rifle? Upon reading through all the paperwork I came back to
reality finding out that this was simply a service grade that had a brand
new CMP stock on it.
Now of course, the next thing that I could think to do was to take this darn
thing apart. I wanted to see what made the clock tick and to start becoming
familiar with this rifle, which apart from the exterior look, was all foreign
to my mind. This was a simple enough process to figure out, and within five
minutes of opening the box I had the stock off the rifle. From there however
I was stumped. Looks like I would have to save that for another day. Apart
from that, my first impressions of this rifle were rather good, although the
stock felt very grainy and unfinished, which is something that I wanted to
fix.
After I was satisfied with the feel of the wood I proceeded to use Tru Oil
Gun Stock Finish in order to put a slight matte shine onto the surface of the
wood. This only took a few coats with steel wool in between coats in order
to monitor how much shine the wood took on. This whole finishing process
took about two days with all the drying time, and the final product can be
seen on the top of part one of this story.
In order to perform all of this stock finishing I had to learn how to
completely disassemble the M1 Garand. In the end all I was left with was a
barreled receiver as well as a heap of tiny parts all over the coffee table.
This was a very time consuming process, and in order to achieve this result
I followed the very detailed instruction on this webpage:
Through this process I came to a couple conclusions, mainly being that the
old WWII soldiers had quite the engineering masterpiece to take apart, clean,
and maintain. I came to learn that the operating rod is supposed to be
strategically bent, but I do not think the op rod spring is supposed to be
bent. The spring on this rifle was drastically curved, twisted, and showed
flat spots on the round spring wire where it had worn against the inside of
the op rod tube. We quickly put in an order with Fulton Armory for a new
spring, and awaited that so I could finally shoot the darn thing.
A few days later the spring arrived and with my new found knowledge of the
Garand I had that old spring taken out and the new one put in within 10
minutes. Now we could move onto the fun stuff and actually shoot some
projectiles to see how accurate this beast was.
This time, taking the rifle apart I got the extractor spring out of the bolt
in under 3 minutes. Looks like I am getting pretty good at taking this rifle
apart… I got the spring out and began examining it. It looked fine to me.
After this conclusion I went onto the World Wide Web and was able to pull up
an original vintage M1 Garand parts breakdown that included specs for parts
such as the extractor spring.
The readout gave me an extended length of .480 inches, as well as the number
of coils that should be in this spring (12). Using this information I found
a magnifying glass and began counting the tiny coils. I counted a few times
and kept coming up with 9 coils. I then measured the length of the spring
with dial calipers, and sure enough it was less than the prescribed .480
inches. Looks like I somehow got a broken spring.
After trying to contact the CMP to get a replacement, we received no call
back. We then decided to go and order once again from Fulton Armory. In
the mail I received an extractor spring that was the correct length! Now
the trick was to get it back into the rifle. After much wrestling, and four
hands to help, we got that little spring back into the bolt, and the rifle
assembled. I was ready to attempt shooting it once again.
Unfortunately, as luck would have it, I was leaving for a backpacking trip
in a few days, so the test firing would have to wait a month or so. When I
did get back, the first weekend we had, we went out bright and early to the
fabled Table Mesa spot in order to figure out if my 600-something dollar
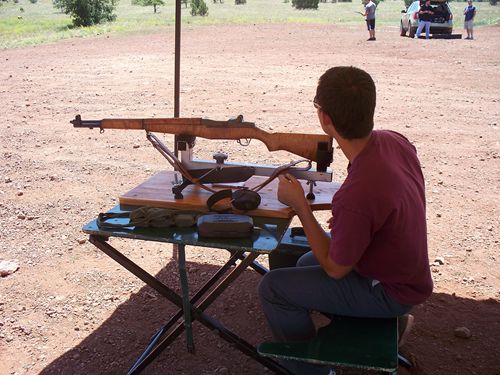
rifle would actually work.
This naturally put a smile across my face, and I can not express how nice it
felt to finally get this “queen of the battlefield” firing and functioning as
it should. With the function testing over, the real test would be to now
figure out what kind of accuracy this rifle could achieve. I suppose that
I’ll have to save that for a later date…
| |||||


| If you enjoyed this story, or found it useful, please consider clicking here to join the NRA at a discount of $15 off the normal membership cost. You will be supporting both this website and adding your voice in support of the Second Amendment. Thank you very much. |

|

|
|