Sorry that this newsletter is two weeks behind the normal
6-week cycle time. Couldn’t be helped. October has been a rather
active hunting month for me, and anyway, I had no exciting feature
story to share with you this time.
I had a turkey hunt up on the Kaibab plateau in mid-October, a week
back to work, then another week deer hunting in unit 16A. Sad to say,
I failed to find my quarry on both hunts, but that’s just the way it
goes sometimes.
So instead of one great, suspenseful, frought-with-danger, but
ultimately successful adventure, I’ve got a handful of little stories
to relate – a mixed bag.
Sammy the Small Game Master
My younger son, Sammy, continues to earn the title of Small Game Master.
On our trip up to the Kaibab, Sam was the first one of us to make game.
Dale Saverud, my two boys, Ben and Sam, and myself were the parties on
this trip. Dale, Ben and I each had tags for turkey. Sam didn’t want
to go at all at first – until I told him that he would have the
opportunity to hunt for blue grouse if he went.
Club V.P. David Stimens had alerted me to the possibility of running
into grouse up on the Kaibab. This was to be my first trip there, and
David had just got back from an archery hunt. He mentioned that he ran
into blue grouse several times during his trip.
Now I’ve been wanting to bag my first blue grouse for a number of years.
They’ve always eluded me. Oh I had seen one once in the White Mountains.
It was midsummer, so they were definitely not in season. It was at the
main campground at Big Lake. What I most remembered was how nonchalant
the bird was. He was in no real hurry to get away from me. He just
kind of sauntered away from me as I tried to approach him.
So Sam asked me, “What’s a blue grouse?” “Oh, it’s kind of like a small
chicken kind-of-bird,” I told him. “Oh! I wanna go! I wanna get a
chicken!”
I had the perfect gun for this hunt – my infamous Savage combo gun.
.223 for the big birds, and 12 ga. for the “chickens.” I had loaded up
a batch of “.223 Heavy Hornet” loads for the turkeys (55 gr. softpoint
at about 2000 fps), and sighted in the Savage to hit right-on with this
load at 100 yards. Sam was issued Ben’s Mossberg Bantam M500 in 20 ga.
Ben was using his favorite centerfire, a T/C Contender Carbine in 6.5mm
T/CU (a .223 necked up to .264 and blown-out). And to round things out,
Dale brought along his 12 ga. Mossberg Model 9200 autoloader as primary,
with his Ruger Number 3 single shot in .223 as backup.
Of course I also brought along the new Polaris Ranger. We were all
sitting around camp midday on the second day of our hunt. We had just
come back from an early morning walk-in-the-woods, on the prowl for
turkey, when I announced, “I think I’m gonna go off Rangering for a
while. Anyone else wanna go with me?”
Unexpectedly, there was no great enthusiasm shown. I suppose that
energy levels were still a little low after the walkabout at high
altitude. Eventually one kid said, “Okay. I’ll go.” Then the other
kid said, “Okay. I’ll go.” Then the other big kid started saddling
up his Mossberg 12 gauge. Hmmm. This presented a little dilemma.
The Ranger only has seating for 3.
Dale ended up sitting in the bed of the Ranger, high up on top of the
storage box. I suppose that he felt that he was in some sort of safari
vehicle or something. He said that sitting up there got him up out of
the dust. And the Polaris did just fine with all four of us aboard,
each of us with guns and rucksacks.
We followed the road we were camped on about two miles down to where
it dead-ended. We hunted around down at the dead-end for about
half-an-hour, saw nothing, loaded up and started heading back toward
camp.
Less than half-way back, I stopped the vehicle. Everyone was wondering
what was going on. I whispered loudly and pointed: “Grouse!” We were
about 75 yards back from where the bird pecked at the road. The next
word I said was, “Sammy!”
I disembarked, ran around to the other side of the Ranger, and pulled
down the hard sided gun case holding Sammy’s shotgun from the top of
the roll cage where it was bungeed. While I was opening the case and
handing the shotgun to Sam, the bird strolled off the road into the
forest. Sam loaded two rounds into the shotgun and chambered one.
Then he crept forward toward the last spot the bird was seen. Loudly
whispering again, I told Sam, “Get off the road – follow him!”
As I stood by the Ranger, Sam disappeared from my view as he stepped
into the forest. About a minute later, BLAM! I heard Dale yell,
“Great shot!” Dale had stepped into the forest next to the Ranger
and saw Sam tumble the bird from a range of about 10 yards.
Dale had brought along a steak for one of his camp dinners, so we
ended up cutting up both steak and grouse breast into strips. Dale
cooked up the meat with onions and we had enough to make grouse and
steak burritos for the four of us for dinner that evening.
So Sammy has now taken squirrel, dove, and now grouse. He’s also hot
to go duck hunting with me this year. We also saw quite a few
antlerless deer in the Kaibab. He’s got two years to go before he’s
old enough to hunt the Youth-Only, Antlerless Deer hunt they’ve had
for the last couple of years in 12A. He’s already excited about that!
The GPS and the Pocket PC
In a past article, I wrote about running Topoquads 3D by Delorme
Mapping on a laptop computer wired to a GPS receiver in my truck
when I’m traveling backroads. It’s great to always know exactly
where you are on the map, or to instantly know when you’ve made
a wrong turn.
I wanted the same capability on the Polaris Ranger, but it soon
became apparent to me that bolting up the laptop to the Ranger
was not the right solution. So I started looking around and
found out that Maptech has
a product called
Pocket Navigator that gives you the same capability in a
Pocket PC. Specifically, Maptech recommends the Compaq iPAQ
Pocket PC.
A Pocket PC is a handheld device that you interact with by using
a stylus to point to things on a touch-sensitive screen. Also
known as Personal Digital Assistants (PDAs), the most popular
and well known PDA is the Palm Pilot. A Pocket PC is very similar,
except that it runs a Microsoft operating system, the latest
version of which is known as Pocket PC 2002.
My birthday was coming up, so when my lovely wife asked me what I
wanted, of course I told her, “a Pocket PC.”
So now I had my Pocket PC. The next step was getting the software.
The problem is that the Maptech software is expensive. Pocket
Navigator is $100, but all it really does is let you view Maptech’s
map software on your Pocket PC. You still would need to buy Maptech’s
Terrain Navigator software for Arizona for another $100.
So while I was saving my pennies for the software, I looked around
some more. I found a package called
OziExplorer created by some guy in Australia for his personal
Jeeping adventures. You can download the software from the internet
and run demo versions of it completely for free. So I tried it.
The version which runs on Pocket PCs is called OziExplorerCE. Like
Maptech’s software, it is really an add-on to the main mapping software
which runs on your desktop PC. What I found out was that the free
demo version of the desktop OziExplorer was all I really needed to get
OziExplorerCE to work on my Pocket PC.
The demo download of OziExplorerCE pretty much does everything the
paid-for version does. The problem is that moving map mode
(communication with the GPS) will only remain active for 20 minutes
each time OziExplorerCE is run. Also, a watermark with the text
“Demo Version” is drawn onto the map.
The good news is that registration is only $25. That surely beats
$200 for the Maptech solution! The bad news is that you get no maps
for that $25. But I would not have gone with OziExplorer if there
wasn’t a solution for that too, right?
The solution is free maps for all of Arizona at the Arizona Regional
Image Archive website
(http://aria.arizona.edu/).
Every Arizona USGS topographical map is available on this website
for free download in the “GeoTIFF” format.
GeoTIFF, as the name implies, is a bitmap image format very similar
to the more familiar TIFF format, but enhanced with additional
georeferencing tags embedded in the file. OziExplorer basically
needs those two things to work: a map image and georeferencing
information. When OziExplorer gets position information from your
GPS receiver, it can then know where to draw YOU on the map.
To get this all to work, I still needed one more piece of the puzzle
– the connection between the Pocket PC and the GPS receiver. The
Pocket PC comes with a synchronization cable which allows you to
connect it to your desktop PC to move information back and forth.
It’s a three-headed cable which allows you the choice of using either
USB or a serial port connection to your PC. And I already had another
three-headed cable which allowed me to hook up my GPS receiver to car
DC power and to the serial port on the laptop. All I needed was a
“null modem” cable to make the serial-to-serial connection between
the two devices. I cobbled one up, hooked everything together, got
all the software and maps installed, and it all worked!
But as you can probably imagine, this cable setup was a nightmare!
Three different cables patched together -- way too much total cable
length -- extra, unused connectors hanging around . . . So I looked
around again for a simple eTrex to iPAQ cable and found one offered by
GeorgeCo.biz.
Yes, GeorgeCo is a one-man garage shop type of operation, but bless
him for that! The cable was $29.49 shipped and does exactly what I
need it to do.
When you’re going on a trip where you want to use this GPS to Pocket PC
mapping system, you first need to download, convert, and store the
topographical quad maps on your Pocket PC for the area of interest.
Each 7.5 minute quad takes up about 5 to 6 megabytes of storage space.
Today’s Pocket PCs typically have 64 MB of space available. You can add
more storage with a memory card.
If all this sounds rather technically involved, well it is. But you know
that I’m the type that thrives on this kind of a technical challenge. I
found it rather fun to figure out how to make it all play together.
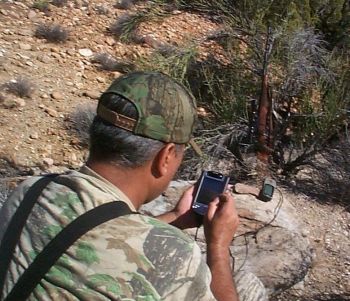
The reward is when you’ve been hiking around in the back country for half
a day, and are able to pull out your GPS, your Pocket PC, hook them up by
a cable, turn everything on and be able to see EXACTLY where you are now
sitting overlooking that canyon!
On the first Saturday of my deer hunt, the rains came and gave me a pretty
good dowsing. My paper maps were soaked through and ruined. I had to rely
on my electronic maps for the remainder of the trip, and that worked just
fine!
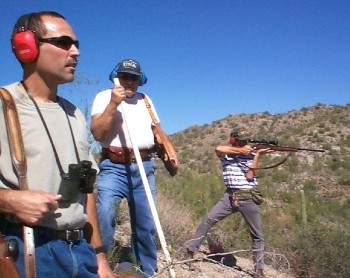
Casualty at the Buckhunter's Challenge
The fall Buckhunter’s Challenge event was held on October 5th. There were
only four attendees (where were you?). That was my biggest bummer. From
my perspective, this is really a very fun event. If you are an Arizona
desert deer hunter, there is no finer practice for taking shots at game.
But I’m not writing to bitch about a lack of attendance. We had our first
Buckhunter’s Challenge casualty on this day.
We held the event at a new spot which is actually about two-thirds of the
way from I-17 to Morristown on I-74. We had to go out that far to get
outside of Peoria city limits! The new spot is in an area popular with
Jeep and ATV enthusiasts, being laced with a number of motor trails. We
used this as an advantage to set up the targets.
From experience at past events, setting up those deer targets at
different spots at ranges approaching 400 yards can be very time consuming.
I brought along the Polaris to transport targets and people around, to
speed setup. That worked great.
When setting up a target, you need to find a big rock that you can place
with the target to protect the electronics from an errant shot. The first
target I set up right over an existing rock outcropping on the hillside.
The rock had a vertical cleft in it which was just the right size to
swallow-up the FRS radio and the eDeer electronics unit. “Perfect,” I
thought, as I placed the electronics, wired up the target, and tested it.
We were almost done with the event and we were shooting at this target
from about 300 yards away. The hunter who shot it before me had taken
2 shots, and having missed both times, decided that it was best to quit
while he was ahead. Wounding shots after having missed twice already,
result in a high negative score being awarded.
I was next. I took my first shot – nothing. I took my second shot –
nothing. Earlier, we had other tries at this target at 390 and 360 yards.
My new 7mm Mag and I were tuned to a high state of hunt readiness. I
had made first-shot kills at both the 390 and 360 yard opportunities. I
turned around and asked, “Did one of you guys take out the electronics?”
I fired my third and final shot – still nothing.
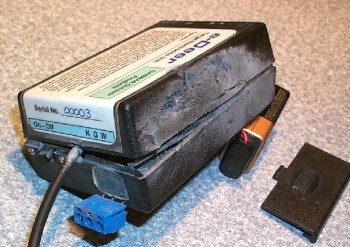
When the shooting was all done, it was time for course take-down. When
I got to the target I found that indeed someone had taken out the eDeer
electronics unit. But it was not a direct hit. Because I had placed the
electronics in a cleft in the rock, the low shot had hit the rock face
behind the electronics. The resulting fragmentation of the bullet had
thrown molten lead forward onto the box.
When I got home, I did a post-mortem examination. The main chip had been
knocked loose out of its socket. The power switch had been ripped apart.
The inside cover of the box was streaked by the molten lead which had cut
its way through the plastic. Nevertheless, once I popped the chip back
into its socket and hot-wired the power, the device still worked! The
box is toast, but all I have to do is repackage it into a new box and all
will be well!
My Newest Finnish Rifle
My interest in old Russian rifles led to an appreciation of the Finnish
Mosin Nagants. Sako was started by the Finns expessly for the purpose of
overhauling old, worn, or broken Russian rifles for issue to the Finnish
Civil Guard. Never having had an interest in modern Sakos before that,
this interest in the old ones caused me to take a good, long look at a
Sako Hunter in 7mm Rem Mag I came upon on the used rifle rack at
Intermountain Outdoor Sports in Meridian, Idaho.
I was in Idaho visiting relatives this past May. A couple of issues ago,
I wrote about Elmer Keith’s Trophy collection displayed at Intermountain
Sports. Alas, since then, Intermountain has gone out of business. I
don’t know what will become of Elmer’s collection. Word is that Jack
O’Connor’s collection is up in Idaho, too, stored, but not on display, at
the University of Idaho.
Anyway, while I was at the store taking pictures of Elmer’s heads, I saw
this rifle. The price tag said $700. Nice, but I never had a particular
hankering for a 7mm Mag. And while not a bad price for a rifle which sells
new for over $1000, There was no reason to be dropping that kind of money
on a rifle I didn’t need.
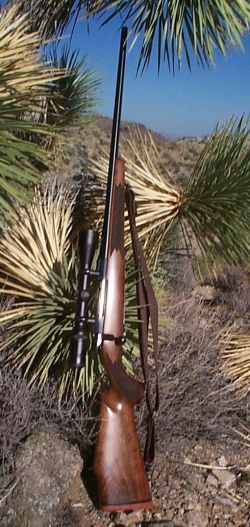
When I picked it up, I noticed that it was basically in like-new condition.
The tag said that rings were included with the rifle, but from what I could
tell, they had never been mounted. It had a beautiful walnut stock with a
palm swell -- nice long, medium contour barrel.
The salesman noticed my interest in the rifle and casually mentioned that
all rifles on the used rack were being discounted 20% for the Memorial Day
weekend sale. A quick mental calculation told me that they would actually
let me take this fine rifle home for only $560! Ka-ching! That was it!
Where’s my wallet? If nothing else, I could take this rifle home and turn
it around for $700 or more and make a quick profit!
When I got it home and started researching it, I found out that it was
probably made in 1996 or 1997. Not long after that, Sako redesigned their
rifles, and rechristened them as the Model 75. This one has a bolt shroud
that looks just like the M75. The M75 however, is a three-lug design,
whereas this one, designated as a model L691, is a two-lug design.
I decided that a fine European rifle such as this deserved a fine European
scope. I ordered-up a Kahles 3-9x42 American Hunter model with the TD
Smith ballistic reticle.
Since I still wasn’t sure I wanted to keep it, I didn’t want to invest in
handloading dies and components for a new (to me) caliber. I bought a
couple of boxes of factory ammo – some inexpensive Remington “green box”
ammo, and some more expensive Federal Premium ammo.
Initial results did not make me happy. This was my first experience with
a “Magnum” rifle. I definitely did not like the wallop it was hitting me
with. Worse, the groups I was getting were mostly over 2 inches, some at
3 inches. Ok, the occasional group would drop into the Ones, but that was
not the norm.
OK. I was ready to sell. I offered it to a couple of guys in the club with
no takers. It rode on my shoulder around the gun show, again with no takers.
Oh what the heck! Let’s try some handloads. I ordered up dies and 140 grain
Nosler Ballistic Tips. I had plenty of brass, having emptied all those
factory rounds. I chose 140 grain bullets, which are on the lighter side for
a Seven Mag, because I wanted to see what I could do to reduce recoil.
Looking at the Nosler load book, I noticed that a top-velocity load for the
140 grain bullet should yield about 3300 fps using around 67 grains of RL-22.
BUT! Powder charge weight is ALSO an important factor in recoil! The book
also told me that I could still get about 3000 fps with just 54 grains of
IMR 4064 – a powder which I had recently been working a lot with for the
7.62x54 Russian. Nothing at all wrong with 3000 fps instead of 3300, if you
ask me! Only the fastest possible loads in a .280 Remington will do 3000.
Recoil calculations, assuming a 9.2 pound rifle weight, told me that this
would reduce kick by a full 25% . . .
| Bullet |
Powder Chrg. |
Velocity |
Recoil |
| Nos. 140 BT |
67.0g RL-22 |
3300 |
20.8 ft-lb. |
| Nos. 140 BT |
54.0g IMR 4064 |
3000 |
15.7 ft-lb. |
But the really great news was that when I range-tested this load, I was
averaging consistent 1 MOA groups. On a blustery day, I shot a 200 yard
group 2.12” wide, but only a half-inch tall! I blame the wind for most
of the horizontal dispersion.
Now about that TDS reticle
on the Kahles scope . . . It looks something like this:
You are provided with complete instructions on how to use it in the scope box,
but here’s a quick run-down on the bullet drop aspect –
Depending on the ballistics of your rifle, your sight-in zero and the bullet
drops at the different range marker bars will be different. Charts are
provided to help you figure it all out. For a muzzleloader, for example,
you would sight in the center crosshair at 100 yards, and the drops at the
RMBs would be for distances of 125, 150, 175, and 200 yards.
For me, using the load talked about above, if you sight-in the center
crosshair to zero at 200 yards, the first RMB down is the bullet drop at
300 yards, the next, 400 yards, the next, 500 yards, and the last, 600
yards.
This is the rifle, scope, and load I was using at the Buckhunter’s
Challenge event. With this setup I made those first-shot 390 and 360
yard kills, and it is the reason I had enough confidence in my shots
at 300 yards to ask the other guys whether they might have taken out
the electronics when I scored an apparent miss.
I don’t know about 500 or 600 yard shots, but if I had to, I was
prepared to make a 400 yard shot on my deer hunt. But the deer in
16A were so smart, the Sako and I never even got a chance.
© Honeywell Sportsman Club. All rights reserved.